Are you looking to modernize your home’s lighting while saving on energy costs? Retrofit LED recessed lighting might be the perfect solution for you. With LED retrofit options available, you can easily upgrade your recessed lights.
This innovative lighting option not only boosts your space’s aesthetic appeal but also offers impressive energy efficiency and versatility, making it a favorite among the DIY community.
We will explore the benefits of choosing retrofit LED lights, provide a tutorial for installation, and highlight essential safety precautions.
Transform your home’s ambiance while reaping long-term savings—read on to discover how! By learning about dimmer considerations, you can further customise your lighting.
What Is Retrofit LED Recessed Lighting?
Retrofitting LED recessed lighting refers to the process of upgrading existing recessed lights or electrical fittings with modern LED downlights using electrical wiring, which enhance energy efficiency and illuminate spaces in a more dynamic way.
This transition is not only about aesthetics; it also significantly contributes to overall home improvement and reduces energy consumption, making it a popular choice among homeowners looking to modernise their lighting solutions in areas such as home offices, large areas, and even sheds.
By leveraging innovative technology, including Wi-FiPhilips Wiz app, these fittings provide flexible lighting options that adapt to various settings and needs.
Why Choose Retrofit LED Recessed Lighting?
Choosing retrofit LED recessed lighting offers several advantages, making it an ideal option for homeowners seeking efficient and versatile lighting solutions in their spaces, particularly when considering new construction or renovation.
One of the most significant benefits is energy efficiency, which saves on electricity bills while promoting eco-friendly practices. Additionally, with a long lifespan compared to traditional bulbs, LED lights can reduce the frequency of replacements, ultimately being cost-effective over time.
Versatile in design, these lights can cater to various colour temperatures and settings, including flush-to-ceiling installations, thereby enhancing the ambience in large areas, home offices, or even cosy sheds.
Find out more: What Is Retrofit Lighting
Energy Efficiency
Energy efficiency is one of the primary benefits of retrofitting LED recessed lighting, as it significantly reduces power consumption compared to traditional incandescent bulbs. By utilising advanced LED technology, these lights provide the same level of brightness while using a fraction of the electricity, making them an environmentally friendly choice that can lead to substantial savings on your energy bill.
With an impressive conversion of wattage into lumens, LED lights ensure optimal illumination with minimal energy use. For instance, a standard 60-watt incandescent bulb can be replaced by an equivalent LED that only consumes about 10 watts. This dramatic reduction not only lowers electricity costs but also lessens the load on electrical wiring in homes, reducing the risk of overheating and potential fire hazards.
Consider the long-term savings: switching to LED could save homeowners up to £100 annually on energy costs, directing funds toward improvements like drywall or other home improvement projects.
The environmental benefits of using these energy-efficient lights cannot be overlooked, as they contribute to reduced greenhouse gas emissions due to decreased energy consumption, embodying a commitment to sustainable living.
- Less power drawn from the grid means lower fossil fuel reliance and encourages the use of LEDs as a standard.
- The longer lifespan of LED lights (up to 25,000 hours) further reduces waste, making them ideal for installations in large areas.
Long Lifespan
The longevity of retrofit LED recessed lighting is another compelling reason to consider making the switch, as these fixtures can last up to 25,000 hours or more, vastly outpacing the lifespan of traditional bulbs. This durability means less frequent replacements and lower maintenance costs, making it a smart investment for homeowners looking to upgrade their lighting systems.
In contrast, incandescent and halogen options typically offer lifespans of just 1,000 to 2,000 hours. This stark difference not only impacts the frequency of replacements but also influences overall maintenance efforts and costs.
When evaluating the transition to LEDs, it is crucial to understand specific installation requirements and safety considerations. Following are some key points to ponder:
- LEDs generate less heat compared to their incandescent counterparts, thus making electrical fixtures safer for home use.
- Proper installation can enhance their lifespan even further, making adherence to guidelines essential.
- The minimal upkeep required for LEDs can significantly ease the burden faced by homeowners over time, particularly if they follow a guide provided by a lighting expert.
Ultimately, the implications for both maintenance and safety make LEDs a sensible choice for those aiming to modernise their space and improve overall home improvement efforts.
Versatility
Versatility is a key feature of retrofit LED recessed lighting, allowing homeowners to adapt their lighting solutions to meet various needs and preferences. Whether it’s creating a cosy atmosphere in a shed or providing bright task lighting in home offices, these LED downlights can be installed flush to the ceiling or in various configurations to highlight corners and specific areas effectively.
This adaptability not only improves the aesthetics of a room but also enhances the overall functionality. When considering the installation options, it’s essential to keep in mind the different colour temperature options available, which can range from warm white to daylight, imparting distinct moods to any space.
- For instance, warmer tones create a relaxed ambience, perfect for living areas, while cooler tones are ideal for kitchens and workspaces, enhancing the overall lighting task.
- The adjustable features of many LED downlights allow for tailored lighting solutions, accommodating specific tasks and activities seamlessly, offering true flexibility in design.
As a result, incorporating these lights can significantly elevate the usability and charm of both everyday spaces and specialised areas in a home, making them an essential part of home improvement projects.
Cost-Effective
Retrofitting LED recessed lighting is not only an energy-efficient choice but also a cost-effective option in the long run, particularly when considering the total costs associated with both energy bills and maintenance.
By investing in high-quality LED fittings, homeowners can expect a significant return on investment through lower power usage and fewer replacements over time, making use of sheet metal screws for secure installation.
The initial investment for retrofitting LED recessed lighting may seem daunting, yet it pales in comparison to the potential long-term savings these systems offer. With reduced energy consumption, the total energy costs can significantly drop, translating to lower monthly bills. Many consumers may qualify for rebates or incentives, allowing for an even smoother transition to this sustainable choice. It is essential to consider the following aspects:
- Initial Cost: Upfront installation might require a higher budget, but it’s a one-off expense that pays off.
- Energy Savings: LEDs use up to 80% less energy than traditional bulbs, leading to substantial reductions in electricity bills.
- Rebates and Incentives: Many local authorities and energy suppliers offer financial assistance for those switching to energy-efficient lighting.
A thorough evaluation of these costs against long-term benefits will help homeowners make an informed decision that not only enhances their living spaces but also fosters a more sustainable future, integrating modern power tools for installation.
What Are The Steps To Install Retrofit LED Recessed Lighting?
Installing retrofit LED recessed lighting involves a straightforward process that can enhance your home’s lighting while saving on energy costs. The process typically begins with gathering the necessary tools such as a power drill, right-angle drill, centre punch, safety goggles, and plaster, ensuring you are well-prepared for every step of the installation process.
Following this, careful measures must be taken regarding electrical wiring to ensure safety and efficiency when upgrading your existing recessed lights, including knowing how to connect connectors.
Step 1: Gather Materials And Tools
The first step in installing retrofit LED recessed lighting is to gather all necessary materials and tools to ensure a smooth process. Essential tools include a power drill, right-angle drill, centre punch, and safety glasses to protect your eyes from debris. Having the appropriate materials like LED downlights, socket adaptors, and c-clip brackets will facilitate the installation of your new lighting.
Without the right equipment, the installation could become tedious and frustrating. To start, a power drill is crucial for making precise holes in ceilings, while the right-angle drill allows access to tight spaces where traditional drills may struggle.
The centre punch assists in ensuring that drilling begins in the correct spot, preventing slips and mistakes, especially when you drill into metal.
Don’t overlook the importance of quality LED downlights; they not only enhance the ambiance but also contribute to energy savings. Combining these tools with safety gear, like gloves, further reduces the risk of injury, making for a safer work environment.
- Quality power drill
- Right-angle drill
- Centre punch
- LED downlights
- Socket adaptors
- C-clip brackets
- Safety glasses and gloves
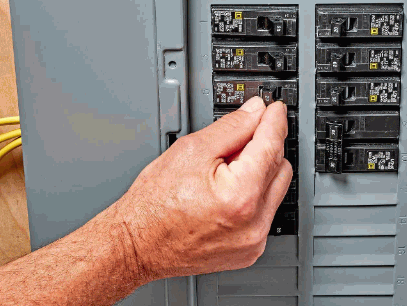
Step 2: Turn Off The Power To The Room
Before beginning the installation of retrofit LED recessed lighting, it is crucial to turn off the power to the room to avoid any electrical hazards. This step is vital for ensuring safety during the entire installation process, as working with electrical wiring poses risks if the power is not interrupted.
To ensure the utmost safety when handling electrical components, one must follow a careful procedure when shutting off the power.
Start by locating your home’s circuit breaker panel, and identify the specific circuit that controls the light fittings intended for the retrofit. Once you have identified the correct switch, flip it to the ‘off’ position, taking care to observe the associated label for accuracy.
Once this is done, it is essential to verify that the power is actually off. Use a voltage tester or a multimeter on the light fitting to confirm that no electricity is flowing through the wires.
This precaution helps to mitigate risks of electrical shock, ensuring a smooth and safe installation for everyone involved.
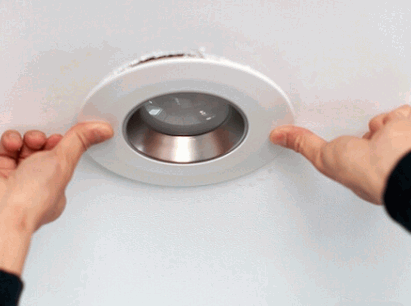
Step 3: Remove Existing Recessed Lighting
The third step in the installation process involves carefully removing the existing recessed lighting or electrical fittings to prepare for the retrofit. This task may require the use of specific tools such as a power drill and sheet metal screws for safely detaching the old fittings without damaging the surrounding plasterboard.
Ahead of starting, it is crucial to ensure that the power is turned off at the circuit breaker to prevent any electrical mishaps. A voltage tester can be employed to double-check that no current is present. Once safe, the homeowner should gather all necessary tools including a wire stripper, a flat-head screwdriver, and, if necessary, a reciprocating saw for cutting through any secured materials.
- Start by removing any decorative covers or trim.
- Carefully unscrew the fitting, taking care not to pull on the wiring.
- If the fitting is secured with clips or screws, those should be removed, and the wiring harness should be gently disconnected.
If there are any unexpected challenges, such as stubborn screws or tight spaces, patience and precision are key. Adhering to best practices during this phase ensures a smooth transition to new fittings without complications or damage to the surroundings.
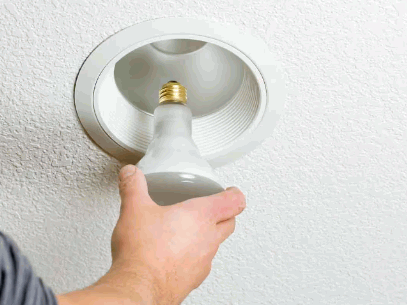
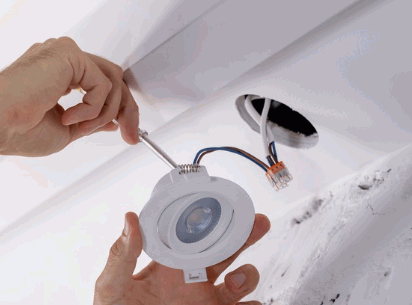
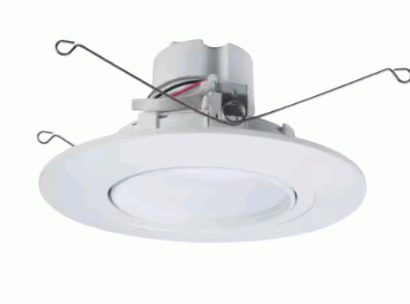
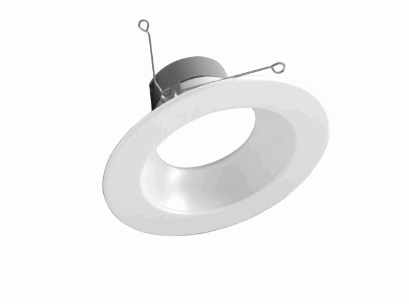
Step 4: Install Retrofit LED Recessed Lighting
Once the old fittings are removed, the next step is to install the retrofit LED recessed lighting, ensuring the new fittings sit flush with the ceiling for a streamlined look. This process involves securing the LED downlights with c-clip brackets, which hold the lights in place and accommodate various ceiling types.
To achieve a perfect installation, it’s essential to first measure the ceiling height, as this will influence how the downlights fit.
- Begin by marking the placement of each downlight, ensuring they are evenly spaced and aligned.
- Next, consider the use of a laser level for precise alignment, making adjustments as needed for sloped or uneven ceilings.
- Before securing the fittings, connect the wiring according to the manufacturer’s instructions, taking care to strip the ends properly for a solid connection.
- Once the connections are made, insert the fittings into their designated spots, pushing gently until they snap into place.
It’s vital to check that each downlight is snug and flush, creating a cohesive look across the ceiling. A quick test of the lights will confirm that they work correctly, brightening the space beautifully.
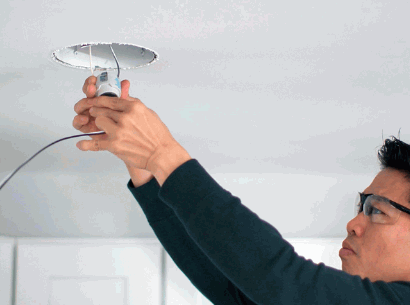
Step 5: Connect Wires And Secure The Light
The fifth step involves connecting the wires of the retrofit LED recessed lighting to the existing electrical wiring, which is crucial for ensuring the lights function correctly. It is essential to use reliable connectors and follow the manufacturer’s instructions to guarantee a secure fit and minimise the risk of electrical issues.
First, wiring stripping is a key procedure that allows you to remove the insulation from the ends of the wires, creating clean and effective connections. Use a wire stripper to ensure you do not damage the wire strands. Once stripped, you can proceed with connecting the wires. For optimal connections, consider the following methods:
- Twist-On Connectors: These are simple to use; just twist the exposed wire ends together and screw on the connector.
- Wire Nuts: These allow for secure connections and are colour-coded for various wire sizes.
- Soldering: For a permanent bond, this method may be used, though it requires additional skills.
Safety should never be overlooked during this process. Wearing insulated gloves and ensuring the power is turned off can help prevent electrical shocks. Also, check local codes and regulations for compliance. If issues arise, such as flickering lights, verifying connections and inspecting for any short circuits can be effective troubleshooting steps.
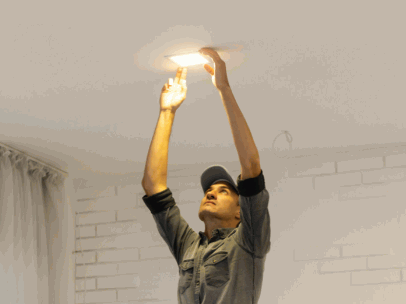
Step 6: Test The Light And Adjust As Needed
After securing the light and connecting the wires, the final step is to test the light to ensure it operates correctly and meets your lighting needs. This involves turning the power back on and checking functionality, as well as making any necessary adjustments to the positioning or colour temperature to optimise the lighting effect in your space.
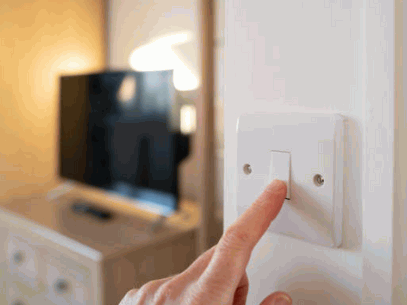
It’s essential to consider whether the lighting fixture interacts properly with any dimmer switches present, as compatibility issues can affect performance.
In situations where the light does not illuminate, several troubleshooting strategies can be employed:
- Check the circuit breaker to ensure it hasn’t tripped.
- Inspect the bulb to verify it’s secure and functioning.
- Examine wiring connections to confirm they are tight and correctly placed.
By thoroughly testing the system and making small adjustments, one can achieve a harmonious lighting solution that enhances the overall ambience and functionality of the room.
What Are The Safety Precautions When Installing Retrofit LED Recessed Lighting?
When installing retrofit LED recessed lighting, adhering to safety precautions is critical to prevent accidents and ensure a successful installation. This includes turning off the power to the room before starting any electrical work, using proper tools such as safety goggles and quality power drills, and following the manufacturer’s instructions meticulously.
Additionally, understanding electrical wiring and the potential hazards involved can make a significant difference in maintaining a safe environment during the process.
Turn Off Power
The foremost safety precaution when installing retrofit LED recessed lighting is to turn off power to the room at the circuit breaker to avoid any risk of electric shock. This crucial step ensures that all electrical wiring is inactive while you work, significantly reducing the chances of accidents.
Before proceeding with the installation, it is essential to double-check that the electricity is truly off. To do this, you can use a non-contact voltage tester, which will indicate if any power is still flowing to the fittings. Remember, even a small amount of electricity can lead to serious injuries, so this verification cannot be overlooked.
- First, locate the circuit breaker panel and identify the corresponding fuse for the room.
- Next, flip the switch to the off position and ensure any indicator lights go out, signalling that the fuse has been successfully shut.
- Before starting any work, use the voltage tester on the light fitting itself to confirm it’s safe to handle.
Taking these precautions not only safeguards the installer but also enhances the overall efficiency of the work being done.
Use Proper Tools And Equipment
Using the proper tools and equipment is essential for the safe and efficient installation of retrofit LED recessed lighting. Tools such as power drills, safety goggles, and effective connectors enhance the installation process and ensure that you can work without injury or hindrance.
Investing in high-quality gear not only minimises the likelihood of accidents but also significantly improves the overall outcomes of the installation. It is crucial to consider the following essential tools:
- Quality power drills – A reliable drill helps in making precise and clean holes, reducing the risk of damage to the ceiling.
- Safety goggles – Protecting your eyes from debris is non-negotiable for a safe working environment.
- Wire strippers – Properly prepared connections lead to optimal performance and longevity of your lighting system.
- Connectors and terminals – Using the right connectors ensures secure and efficient electrical connections, thereby preventing future issues.
Choosing these quality tools can greatly enhance efficiency, allowing for a smoother installation process while avoiding common DIY pitfalls. Ultimately, having the right equipment does not just simplify the job but also enhances the satisfaction of achieving a successful outcome.
Follow The Manufacturer’s Instructions
Following the manufacturer’s instructions closely is an important safety precaution during the installation of retrofit LED recessed lighting. These guidelines are designed to ensure that the installation process adheres to safety standards and effectively utilises the features of the LED lights.
When installing such lighting, it’s crucial for homeowners and electricians alike to recognize that following these guidelines not only promotes optimal functionality but also significantly reduces the risk of electrical malfunctions. If one chooses to overlook these essential steps, it could lead to serious consequences such as short circuits or even fire hazards.
- Adhering to voltage specifications helps prevent damage to the lights.
- Proper insulation requirements are vital for fire safety.
- Ensuring secure connections minimizes the potential for energy loss and flickering.
Thus, by diligently respecting the manufacturer’s protocols, users can enhance the longevity and performance of their lighting systems.
Seek Professional Help If Needed
If at any point during the installation of retrofit LED recessed lighting you feel uncertain about the electrical wiring or the installation process, it is wise to seek professional help. This ensures not only your safety but also the proper installation of the lighting fixtures, which can save time and avoid costly mistakes.
Electrical systems can be intricate, and even a small error may lead to dangerous situations such as fires or electrocution. Therefore, it is essential to recognise when the expertise of a qualified electrician is needed. Common scenarios include:
- When you are dealing with outdated wiring.
- If the circuit keeps tripping.
- When installing lighting fixtures that require a high wattage.
In such cases, calling in a professional electrician not only protects your safety but also ensures compliance with local regulations. To find reliable assistance, consider asking for recommendations from friends or searching online reviews for local contractors. Checking if they are licensed and insured can also add an extra layer of confidence in your choice.